Springboot 시큐리티 권한 처리 및 타임리프에서 확인하기.
Authority; 권한 부여하기
권한 구조 설계
권한을 부여하기 위해 사용자의 권한 구조를 설계한다.
-- 사용자가 저장되는 테이블
CREATE TABLE IF NOT EXISTS test_user (
    id BIGINT AUTO_INCREMENT PRIMARY KEY,
    user_id VARCHAR(255) NOT NULL,
    user_pw VARCHAR(255) NOT NULL,
    user_type VARCHAR(255) NOT NULL,
    user_name VARCHAR(255) NOT NULL,
    user_email VARCHAR(255) NOT NULL
);

-- 사용자의 역할이 저장되는 테이블
CREATE TABLE IF NOT EXISTS test_user_role (
    id BIGINT AUTO_INCREMENT PRIMARY KEY,
    user_id VARCHAR(255) NOT NULL,
    role_name VARCHAR(255) NOT NULL
);

-- 사용자의 권한이 저장되는 테이블
CREATE TABLE IF NOT EXISTS test_user_authlist (
    id BIGINT AUTO_INCREMENT PRIMARY KEY,
    user_id VARCHAR(255) NOT NULL,
    auth_name VARCHAR(255) NOT NULL
);
실제로 간단하게 생각하고 진행해서 두 테이블이 연관은 없지만 연관관계를 맺어도 크게 상관은 없다. 어디까지나 예시일 뿐.
인증 정보에 권한 정보 저장을 위한 세팅
권한을 정보 저장을 위한 객체 설계
사용자의 권한 정보를 가지고 있을 구조체를 생성한다.
UserAuthorities
package dev.chiptune.springboot.security.authority;

import lombok.AllArgsConstructor;
import lombok.Getter;
import lombok.NoArgsConstructor;
import lombok.Setter;

import java.util.List;

@Getter
@Setter
@AllArgsConstructor
@NoArgsConstructor
public class UserAuthorities {
    String userId;
    List<String> userTypeRole; // 역할이 저장될 구조체
    List<String> authorities; // 권한이 저장될 구조체

    @Override
    public String toString() {
        return "UserAuthorities{" +
                "userId='" + userId + '\'' +
                ", userTypeRole=" + userTypeRole +
                ", authorities=" + authorities +
                '}';
    }
}
간단하게 구현하느라 List<String> 형태를 띄고 있지만, 다른 객체여도 무방하다.
권한을 조회하는 서비스 작성
권한을 조회하는 서비스를 작성한다. UserDetailsService를 구현한 서비스에서 해당 권한을 조회하도록 세팅했다.
권한을 조회하는 시점 결정
사용자의 권한을 어디서 가져올 것인지 정해야 한다. 나 같은 경우에는 인증 구간에서 사용자의 정보를 검증하여 가져오게 된 후 인증 성공 객체를 넘기기전에 해당 권한 정보를 세팅하기로 했다.
다음은 인증 구간인 인증 공급자 쪽에 해당 구간을 세팅한 모습니다.
CustomAuthenticationProvider
package dev.chiptune.springboot.security.provider;

import dev.chiptune.springboot.repo.UserRepository;
import dev.chiptune.springboot.security.token.CustomAuthenticationToken;
import dev.chiptune.springboot.security.userDetails.CustomUserDetails;
import dev.chiptune.springboot.security.userDetails.CustomUserDetailsService;
import org.springframework.security.authentication.AuthenticationProvider;
import org.springframework.security.authentication.BadCredentialsException;
import org.springframework.security.core.Authentication;
import org.springframework.security.core.AuthenticationException;
import org.springframework.stereotype.Component;

@Component
public class CustomProvider implements AuthenticationProvider {

    private final CustomUserDetailsService customUserDetailsService;

    public CustomProvider(CustomUserDetailsService customUserDetailsService) {
        this.customUserDetailsService = customUserDetailsService;
    }


    @Override
    public Authentication authenticate(Authentication authentication) throws AuthenticationException {

        CustomAuthenticationToken customAuthenticationToken = (CustomAuthenticationToken) authentication;

        System.out.println("------------------------------");
        System.out.println("customAuthenticationToken : " + customAuthenticationToken);
        System.out.println("------------------------------");


        // 여기서 사용자의 아이디와 비밀번호로 데이터베이스에서 사용자 검증이 완료된다.
        CustomUserDetails user = new CustomUserDetails(customUserDetailsService.attempLogin(
                customAuthenticationToken.getPrincipal(),
                customAuthenticationToken.getCredentials()
        ));

        System.out.println("------------------------------");
        System.out.println("Provider user : " + user);
        System.out.println("------------------------------");

        if (user.getUsername() == null) {
            throw new BadCredentialsException("username is not found. username=" + user.getUsername());
        }
        // 인증 완료? 권한을 넣어서 토큰을 리턴해주자.
        user.setRoles(customUserDetailsService.getUserAuthorities(user.getUserId()));
        return new CustomAuthenticationToken(user, user.getAuthorities());
    }

    @Override
    public boolean supports(Class<?> authentication) {
        return CustomAuthenticationToken.class.isAssignableFrom(authentication);
    }
}
인증 정보 객체인 CustomUserDetails에 해당 권한 정보를 넣을 구간을 마련해주고 시큐리티에 저장하기 위한 권한 형태를 만들 때 사용하는 getAuthorities 를 구현한다.
참고로 시큐리티에서는 권한을 String 배열 형태로 1차원으로 저장하고, 해당 배열에 권한이 있냐 없냐를 판단하여 체크를 진행하기 떄문에 그 형태에 맞추어 작업을 진행해야 한다.
권한을 저장할 때는 별도의 인증 구현 없이 사용한다면 ROLE_ prefix가 자동으로 붙는다고 하는데 직접 구현할 때는 붙여주어야 시큐리티에서 체크가 가능하다.
CustomUserDetails
@Getter
@Setter
public class CustomUserDetails implements UserDetails {

    private Long id;
    private String userId;
    private String userPw;
    private String userType;
    private String userName;
    private String userEmail;

    private UserAuthorities roles;


    public CustomUserDetails(User user) {
        this.id = user.getId();
        this.userId = user.getUserId();
        this.userPw = user.getUserPw();
        this.userType = user.getUserType();
        this.userName = user.getUserName();
        this.userEmail = user.getUserEmail();
    }

    @Override
    public Collection<? extends GrantedAuthority> getAuthorities() {
        List<GrantedAuthority> authoritiesCollection = new ArrayList<>();
        if (roles != null) {
            for (String roleName : roles.getUserTypeRole()) {
                // 역할명을 GrantedAuthority로 추가
                authoritiesCollection.add(new SimpleGrantedAuthority("ROLE_" + roleName));
            }
            for (String auth : roles.getAuthorities()) {
                authoritiesCollection.add(new SimpleGrantedAuthority(roles.getUserId() + "_" + auth));
            }
        }
        System.out.println("------------------------------");
        System.out.println("authoritiesCollection : " + authoritiesCollection);
        System.out.println("------------------------------");
        return authoritiesCollection;
    }

    @Override
    public String getPassword() {
        return userPw;
    }

    @Override
    public String getUsername() {
        return userName;
    }

    @Override
    public boolean isAccountNonExpired() {
        return false;
    }

    @Override
    public boolean isAccountNonLocked() {
        return false;
    }

    @Override
    public boolean isCredentialsNonExpired() {
        return false;
    }

    @Override
    public boolean isEnabled() {
        return false;
    }
}
이렇게 세팅하면 사용자 인증 시, 데이터베이스에 사용자가 있음이 검증된다면 서비스에서 권한을 조회하여 인증 정보쪽에 세팅하게 된다.
이를 확인하기 위해 타임리프 페이지에서 조회가 가능하도록 해보았다.
결과 조회
컨트롤러
자바 영역에서는 아래처럼 시큐리티 컨텍스트에서 조회가 가능하다.
@GetMapping("/home")
    String home(Model model) {
        System.out.println("------------------------------");
        System.out.println("home : " + SecurityContextHolder.getContext().getAuthentication());
        System.out.println("home : " + SecurityContextHolder.getContext().getAuthentication().getAuthorities().toString());
        System.out.println("------------------------------");
        // model.addAttribute("authentication", SecurityContextHolder.getContext().getAuthentication());
        return "home";
    }
타임리프와의 연동을 통한 권한 체크
확인을 위해 사용자에게 일반 사용자 권한을 주고 페이지를 로딩해봤다.
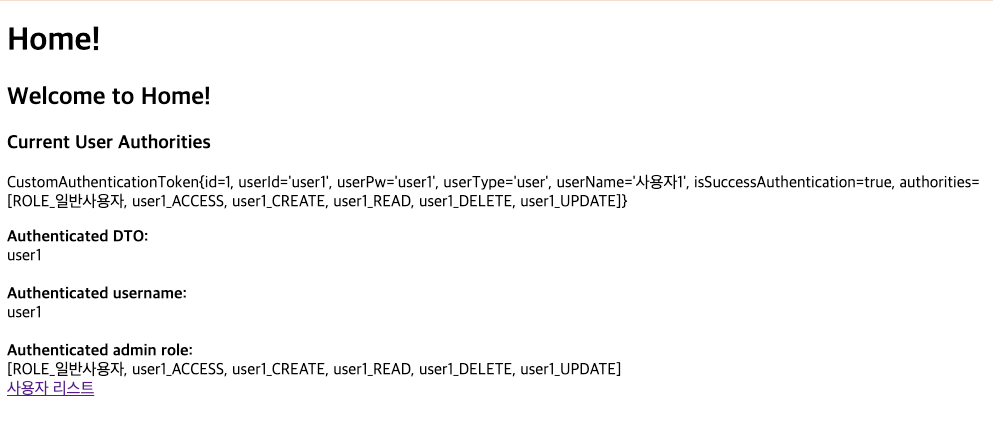
화면에서 볼 수 있듯이, 사용자리스트만 조회 가능하다. 아래 소스에서 볼 수 있듯 타임리프 시큐리티 라이브러리를 사용해서 타임리프에서도 바로 권한을 체크할 수 있다.
<!DOCTYPE html>
<html xmlns:th="http://www.thymeleaf.org" xmlns:sec="http://www.thymeleaf.org/extras/spring-security" lang="ko">
<head>
    <title>Home</title>
</head>
<body>
<h1>Home!</h1>
<div>
    <h2>Welcome to Home!</h2>
    <h3>Current User Authorities</h3>
    <div>
        <p th:text="${#authentication}"></p>
    </div>
    <!--인증시 사용된 객체에 대한 정보-->
    <b>Authenticated DTO:</b>
    <div sec:authorize="isAuthenticated()" sec:authentication="name"></div>

    <br/>
    <!--인증시 사용된 객체의 Username (ID)-->
    <b>Authenticated username:</b>
    <div sec:authorize="isAuthenticated()" sec:authentication="credentials"></div>

    <br/>
    <!--객체의 권한-->
    <b>Authenticated admin role:</b>
    <div sec:authorize="isAuthenticated()" sec:authentication="authorities"></div>

    <div sec:authorize="hasAuthority('ROLE_일반관리자')">
        <a href="admin/">관리자 리스트</a>
    </div>
    <div sec:authorize="hasAuthority('ROLE_일반사용자')">
        <a href="user/">사용자 리스트</a>
    </div>
</div>
</body>
</html>
참고로 타임리프에서 확인을 하려면 HTML 상의 xmlns:sec="http://www.thymeleaf.org/extras/spring-security" 를 추가하는 것도 중요하지만, build.gradle 에 아래 의존성을 반드시 추가해야 한다.
// thymeleaf spring security
    implementation 'org.thymeleaf.extras:thymeleaf-extras-springsecurity5'
또한 백엔드에서는 아래처럼 패턴에서 권한 체크를 할 수도 있다. 요건 찾아보면 자료가 많다.
// ...
// authorize.antMatchers("/api/**").hasAuthority("ROLE_API_USER").antMatchers("/**").hasAuthority("ROLE_USER")
// ...
예제 소스는 여기 에서 확인 하실 수 있습니다!