ECR - Spring Boot + JSP 프로젝트 JIB로 ECR 업로드하기
기존 작업은 보통 RESTful API 형태로 구성이 된 서비스를 주로 jib로 올렸었지만, 기존 MPA 서비스와 동일한 Spring Boot 프로젝트를 ECR에 업로드해야할 일이 생겼다.
기존 프로젝트의 경우, 백단 요청만 받아서 처리하면 되기에 JAR파일로 묶어 Jib를 통해 ECR에 배포되는 형태를 가졌으나 이번에는 웹 리소스까지 포함된 전체 프로젝트를 배포하여 운영해야 하는 상황이었다.
JAR vs WAR
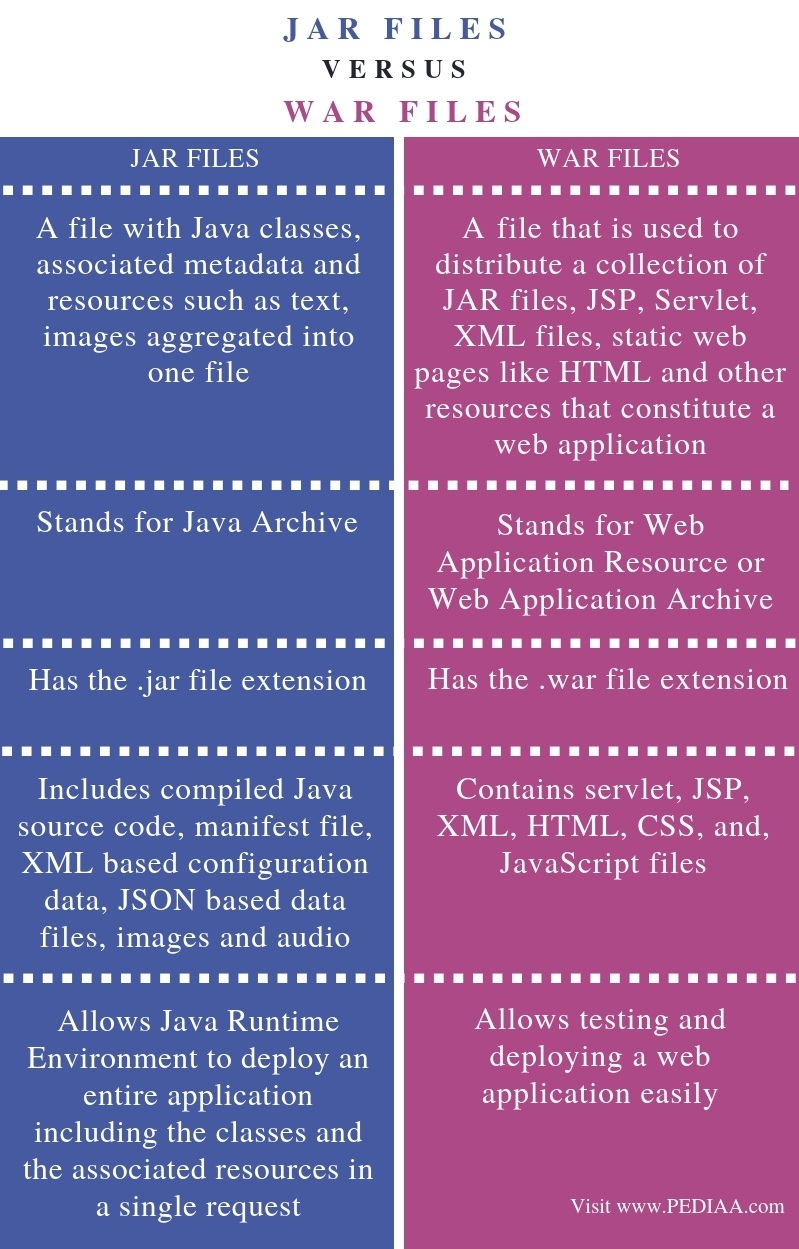
- JAR : Java 클래스, 메타데이터 등으로 구성된 자바 어플리케이션을 구동하기 위한 파일
- WAR : JAR 구성 파일을 포함하여 서블릿이나 JSP등 웹 애플리케이션을 배포 및 테스트 하기 위한 파일들로 구성된 파일
주요 차이점은, 해당 파일들을 구성하는 내용 측면에 존재한다는 것. 어찌됐건 애플리케이션을 만들어 배포할 수 있다는 점에서는 큰 맥락을 같이 한다.
따라서, 본인이 만든 웹 애플리케이션을 어떤 구성으로 배포를 할 것인지는 선택의 문제다.
참고 : https://pediaa.com/what-is-the-difference-between-jar-and-war-files/
Jib
도커 데몬 없이 빌드 이미지를 빠르게 구성하여 원하는 레파지토리/레지스트리로 Push가 가능한 툴
https://github.com/GoogleContainerTools/jib/blob/master/jib-gradle-plugin/README.md#extradirectories-object
Jib JAR / Jib WAR
Jib 를 통해 ECR에 푸시하기로 하고, 이를 위해 jib를 세팅하였다.
기존에 작성해놓았던 jib 를 어느정도 참고하고 JAR배포와 WAR배포 차이에 따라 적절히 옵션을 나누어 사용했다.
참고 - maven 사용 시
https://github.com/GoogleContainerTools/jib/blob/master/jib-maven-plugin/README.md#extradirectories-object
참고 - gradle 사용 시
https://github.com/GoogleContainerTools/jib/blob/master/jib-maven-plugin/README.md#extradirectories-object
JIB 배포 코드 작성
우선, AWS에 개발/데모/운영 3개의 환경으로 나뉘어있어 프로파일 적용을 하였고 이미지 태그를 현재 날짜로 주어 최소한의 구분이 가능토록 하였다. AWS CI/CD에서는 배포된 이미지에 큰 변경이 없으면 새로 빌드하여 배포하지 않기 때문에 최소한의 버전 구분이 필요하다
- Spring Boot Jar 배포
// command_line 에서 -Dname=Value 로 넘어오는데 -D 는 System property 의미. 따라서, System.getProperty 로 가져온다.

// 프로젝트 네임 설정
def project = "project_name"

// 프로젝트 메이저 버전명
def major_version = "0.1"

// 현재시각
def getDate() {
	new Date().format('yyyyMMddHHmm')
}

jib {
	// profile, image_name 변수 설정
	def profile = System.getProperty('profile')
	def image_name

	// profile 에 따른 image 설정
	// dev 		: 개발서버
	// demo 	: 데모서버
	// live 	: 운영서버
	if ( profile == 'dev' ) {
		// 개발 세팅
		image_name = "{ecr url}/" + project
	} else if ( profile == 'demo') {
		// 데모 세팅
		image_name = "{ecr url}/" + project
	} else if ( profile == 'live') {
		// 라이브 세팅
		image_name = "{ecr url}/" + project
	} else {
		// exception
	}

	from {
		image = "adoptopenjdk/openjdk8:alpine-jre"
	}
	to {
		image = image_name
		tags  = [major_version +'.' + getDate()]
	}
	container {
		// Set JVM options.
		jvmFlags = ['-Dspring.profiles.active=' + profile, '-XX:+UseContainerSupport', '-Dserver.port=8080', '-Dfile.encoding=UTF-8']
		// Expose different port.
		ports = ['8080']
	}
	println "#######################################################################"
	println "profile : " + profile
	println "image name : " + image_name
	println "tag : " + major_version + "." + getDate()
	println "#######################################################################"
}
- 위 Jar 코드 기반 WAR jib 배포 코드
// 프로젝트 네임 설정
def project = "project_name"

// 프로젝트 메이저 버전명
def major_version = "0.1"

// 현재시각
def getDate() {
    new Date().format('yyyyMMddHHmm')
}

jib {

    // profile, image_name 변수 설정
    def profile = System.getProperty('profile') == null ? "dev" : System.getProperty('profile')
    def image_name

    // profile 에 따른 image 설정
    // dev      : 개발서버
    // demo     : 데모서버
    // live     : 운영서버

    if ( profile == 'dev' ) {
        // 개발 세팅
        image_name = "{ecr url}/" + project
    } else if ( profile == 'demo') {
        // 데모 세팅
        image_name = "{ecr url}/" + project
    } else if ( profile == 'live') {
        // 라이브 세팅
        image_name = "{ecr url}/" + project
    } else {
        // exception
    }

	// 빌드 파일 추가 옵션
	extraDirectories.paths = "build/libs"

	from {
		image = "adoptopenjdk/openjdk8:alpine-jre"
	}
	to {
		image = image_name
		tags  = [major_version +'.' + getDate()]
	}
	container {
        // Set JVM options.
        if ( profile == 'dev' ) {
			entrypoint = ['java','-Dspring.profiles.active=' + profile, '-XX:+UseContainerSupport', '-Dserver.port=8080', '-Dfile.encoding=UTF-8', '-Xms512m', '-Xmx1024m', '-jar','/acaas-admin.war','']
        } else if ( profile == 'demo') {
			entrypoint = ['java','-Dspring.profiles.active=' + profile, '-XX:+UseContainerSupport', '-Dserver.port=8080', '-Dfile.encoding=UTF-8', '-Xms512m', '-Xmx1024m', '-jar','/acaas-admin.war','']
        } else if ( profile == 'live') {
			entrypoint = ['java','-Dspring.profiles.active=' + profile, '-XX:+UseContainerSupport', '-Dserver.port=8080', '-Dfile.encoding=UTF-8', '-jar','/acaas-admin.war','']
        } else { }
        // Expose different port.
        ports = ['8080']
    }

    println "#######################################################################"
    println "profile : " + profile
    println "image name : " + image_name
    println "tag : " + major_version + "." + getDate()
    println "#######################################################################"

}
Jib Github 에도 언급된 내용인데 기본적로 JIB는 JAR 형식의 배포가 기본이고 WAR 프로젝트에 대해서는 조금 다른 옵셔닝을 해주어야 한다.
Jib also containerizes WAR projects. If the Gradle project uses the WAR Plugin, Jib will by default use jetty as a base image to deploy the project WAR. No extra configuration is necessary other than using the WAR Plugin to make Jib build WAR images.

Note that Jib will work slightly differently for WAR projects from JAR projects:

container.mainClass and container.jvmFlags are ignored.
The WAR will be exploded into /var/lib/jetty/webapps/ROOT, which is the expected WAR location for the Jetty base image.
To use a different Servlet engine base image, you can customize container.appRoot, container.entrypoint, and container.args. If you do not set entrypoint or args, Jib will inherit the ENTRYPOINT and CMD of the base image, so in many cases, you may not need to configure them. However, you will most likely have to set container.appRoot to a proper location depending on the base image. Here is an example of using a Tomcat image:
https://github.com/GoogleContainerTools/jib/blob/master/jib-gradle-plugin/README.md#war-projects
위 설명을 보면, WAR 프로젝트 배포시에는 container.mainClass, container.jvmFlags 옵션은 무시되며, 기본 웹 앱 경로가 fix 된다. 그리고 Entrypoint 나 cmd 옵션이 정의되지 않는다면 이 또한 적용되지 않는다.
따라서 WAR 배포시에는 베이스 이미지를 JDK로 잡을 것이라면, Dockerfile로 애플리케이션을 기본 배포하는 것 처럼
WAR 파일을 베이스 이미지에 포함시키고
해당 파일을 java -jar를 통해 실행시키는
방법을 취해야 한다. 위 JIB 코드를 보면 해당 내용들 또한 추가가 되어있는 것을 볼 수 있다.
보통 검색해보면, WAR 프로젝트의 경우 리소스 크기가 크고, 이를 서버에 올렸을 경우에는 CPU 이용률이 높아지는 등의 문제가 있으니 JAR 형식을 사용하라고 권고하고 있다. 하지만 WAR 또한 애플리케이션을 배포하는 방법 중의 하나이고 기존의 배포 툴에서 지원하지 않는 것도 아니다.
다만, 현재 운영하고자 하는 환경에 있어 WAR 프로젝트의 리소스 크기나 사용률에 문제가 없다면 해당 방식으로 배포하는 것도 결코 나쁘지 않은 선택이라고 할 수 있다고 본다.